Category Archives: ensembles

Music Production Tutorials Explores Frame 3

Danny J. Lewis of Music Production Tutorials tried out my free Frame 3 ensemble and liked it so much he made a brief video demonstrating what happens when you explore parameter changes in one of the default snapshots.


What’s interesting here is how deep he goes into the sound… Frame was designed for just this sort of exploration, for deep dives into detailed samples to bring out hidden goodies and details.

More on Frame 3 including download link and tutorial seriesĀ 

Frame’s big brother Loupe is here

Ghost Shift: Multitap Filtered Delay Effect for Reaktor

Heeeeere’s Ghost Shift!


Ghost Shift is a delay effect based on an earlier version of mine called Pumpkin. I’ve reskinned it, added functionality and fine tuned the filter and feedback parameters for easier sound tweaking.

The major thing you have to know about Ghost Shift is that each delay line works as a separate voice in Reaktor. Adding more voices in the instrument parameters…

…is gonna give you more delay taps, and magically, the number of controls in the delay time, pan etc. graphs will auto-adjust to the number of voices / delay taps.

Each voice can have its own delay time as a multiple of 16th notes, separate pan, feedback and filter settings. I’ve included just a handful of presets because the settings are going to be highly dependent on the material you’re running through the instrument. Really sparse input with lots of space can have more delay lines and more filter feedback. A more full audio track, like a drum kit, will benefit from no more than three delay taps, widely panned, and not much feedback. Let experience and experiment be your guide.

Everything’s tool tipped and self explanatory. A saturator can boost the signal as well as keep it from clipping unpleasantly at the output. The one control you will want to have mapped to a controller or mod wheel is the Mixer, so you can crossfade between dry and wet signal. You’ll hear that happening in this Soundcloud demo:

So how does one obtain this marvelous and endlessly entertaining Ghost Shift device? Click here:

Add to Cart

It’s free! Enjoy!

Great Free Reaktor Ensembles for New Users

Update: the mysterious and inimitable Len9 has updated the excellent Mortmain Reaktor Resource page with fresh links to ensembles, tutorials, general information and utilities. His page has been around since I first took an interest in Reaktor years ago and with this update it’s still the best one page overview of everything Reaktoriffic on the net.

click the logo to go to Len9’s resource page

Now that the great Reaktor $99 sale of 2013 is over we have a nest of new Reaktor hatchlings that require feeding! This is a couple of pointers to great ensembles in the user library.

Synth in a case: you know you want it

Your first stop should be the all time top 100, where you’ll find goodies like ZooTook’s Synth In A Case, the venerable but still worthy 3X by James Walker Hall, and the Morphing Minimal Drum Machine by Martin Brinkmann. When you’re on the page of a particularly good ensemble, make sure to click on the author’s name for a list of everything they’ve done in the library, and don’t just sort by user rating – Martin Brinkmann in particular has a lot of really interesting ideas implemented in older ensembles that aren’t highly rated. Do get MadPad.

You will want to collect the ensembles of Rick Scott and Dieter Zobel. It’s awesome how much the character of the builder can come through in Reaktor ensembles and they offer many examples of this. Especially check out some of the older Zobel contraptions, like Pole-Onaise which I remixed into Dubby Red Planet. Another gorgeous Zobel joint is Locutus II and don’t forget Haemotherapy (both versions). Locutus and Haemotherapy are in my top 5 Reaktor ensembles of all time for their weirdness and individuality.

A whole whack of great uploads can be yours free, courtesy of Sonictwist! (who went on to found Twisted Tools). Get’em all!

Intermediate to advanced builders will appreciate the ability to build their own modulars with click-to-connect front panels courtesy of Hervig Krass. Noobs can enjoy his finished instruments and example modulars.

Around the net, don’t miss the great instruments and effects of Boscomac.

Finally, when you’re looking for a simple and direct granular sampler that cuts through the usual bells and whistles, check out my own Frame 3.

This is a quickie thumbnail sketch of a few ensembles that stand out in my mind but there are many, many more… I know I’ve neglected many great builders, and if you have favorites of your own I haven’t mentioned, please leave a link in the comments!

Happy exploring, downloading, building and music making.

Update: bftucker from the KVR forums provided a link to this PDF from Simon Hunt that describes a wide range of user ensembles classified by type – granular, effect, beat sequencer, etc. A little old but that’s cool because it probably has a lot of stuff that’s slipped off the radar by 2013.

Update 2: Can’t believe I forgot Antonio Blanca’s superb Dron-e. 

Update 3: Oh and also Blanca’s Nod-e. (Hat tip: David DeLizza)

Update 4: Thanks to Ronnie from Rekkerd, three more suggestions: Rubiter Ate, Concept X and Fourious plus Fourious 2000. To which I will add, check out the other synths by Paul Woodroffe and Stephan Becker too. Soon you’ll have a formidable armada of great sounding and unique synths.

Adding Samples to the Frame 3 Creative Sampler

This is a quick video tutorial on adding samples to Frame 3, my free creative sampler for Reaktor which you can download here, where you will also find Part 1 of the tutorial. Part 2 is here.
 

Update: just got a great idea from a KVR forum member: adding unison effects to Frame 3. It’s very easy – simply bump up the number of voices in the instrument’s function palette tab, and set the min / max to a factor of the voice count. Here for example, each note you play will have four voices. Play with the “spread” control too, which determines the amount of detune between unison voices.

Related posts:


Frame Tutorial Part 2: Position and Length Controls

Hi Reaktorists! I hope our American friends have had a great Memorial Day weekend and are back in the office or classroom, ready to slack off at their desks and learn more about Reaktor. šŸ˜‰

Today we’re going to look at the mechanisms by which Frame 3 sets sample playback position and length. Don’t have Frame 3 yet? It’s a free download here, where you can also get part 1 of the tutorial. So let’s drill down into the structure.


First off, notice that the grain cloud sampler module (here labeled Frame Cloud – you can usually rename these things in the properties) has a “Len” output port. This sends out the length of the sample in milliseconds when a different sample is selected or played back. I’ve highlighted the “Len” port and relevant wire here, and turned on wire debugging so we can hover the mouse to see the
values the connection is sending.


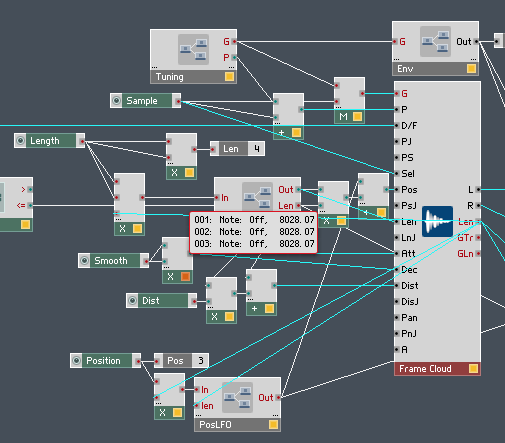
 The Len value goes to a multiplier where it is scaled by the Length control. If you multiplied the value from Len by a value between zero and one, you would get a potential length from zero to the maximum possible length of that particular sample. We can do something more useful, though, by setting different min and max values for that control:

Here, the Min value is 0.05, because we don’t want to scale the sample playback length all the way down to zero. Having done some trial and error experimentation, 0.05 is about right for samples composed of short musical phrases, 5 to 10 seconds long. Feel free to experiment with this though, as slight changes to very small grain lengths in a granular sampler can yield vastly different tones.

The Max value is set to 0.5 – however, notice that the value from the Length knob multiplies the sample length twice, giving us a nonlinear curve. This makes it easier to get smaller length values by tweaking the knob. (more on basic math in Reaktor here) The maximum length with a value of 0.5 is a quarter of the sample length. If you want a longer sample playback window, changing this value to 0.6 to get a max length a little more than one third the length of the sample works well too.

The Len output also gets scaled by the Position knob to set the playback position. Here are the properties for the Position control:

This is a straight zero to one, and it’s only multiplied by Len once, because we want the full range of travel of the length of the sample and we want the travel to be linear. However, notice that the mouse resolution is turned up to 1022 and there’s a very small step size.

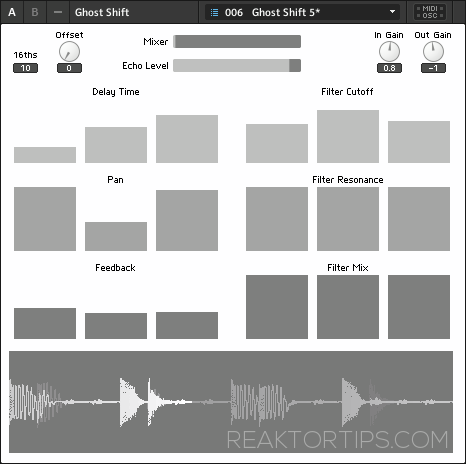
Popping up one level in the structure, here’s a mouse area module, which appears (or more strictly speaking, doesn’t appear!) on the front panel of the instrument as a transparent overlay over the waveform display. The mouse area will appear greyed-out and visible when the panel is unlocked, allowing you to move and scale it, but becomes transparent and invisible when the panel is locked, unless you’ve altered its properties in the view tab.

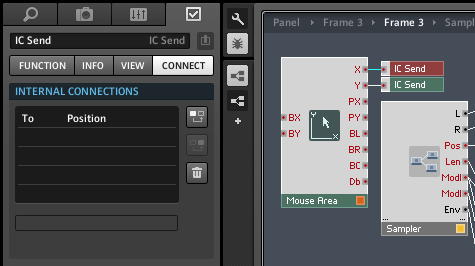
The point of the mouse area is to allow you to click and drag on the waveform to set the position and length of the sample playback area. Instead of connecting directly to the sampler module, the mouse area uses two IC Send modules to connect to the position (X) and length (Y)  controls on the front panel. That way, clicking and dragging to move the playback window also moves the knobs and keeps everything in synch.

The two other important things to note about the position and length controls is that they can be modulated by the LFO macros, and that the current position and length are shown by translucent  blue-green indicators on multi and poly display modules. We’ll look at the how and why of that in upcoming installments of the Frame 3 tutorial series.

That’s all for today, so in the meantime experiment and explore, and enjoy.

ADDENDUM: Reaktor Tips reader BD noticed that some of the parameters in Frame weren’t mappable in Ableton Live. Here’s how to fix that. Number one, click on the Frame 3 title bar so the instrument is focused:

Number two, on the instrument properties “connect” tab, in the IDs menu at the bottom, do an “instrument down” and then a “sort and compress IDs”.

Sadly, this will likely undo any mappings you’ve already done in your DAW, but there aren’t many in this instrument and after this procedure you will be able to map them all. Make sure to save the instrument so you don’t have to do this again next time. I’ve updated the downloadable file but have included these instructions because a) it’s handy to know, and b) you’ve probably already saved your own modified versions of Frame 3 by now with your own snaps and sample maps.