Category Archives: ensembles

Frame 3 – Free Creative Sampler for Reaktor + Tutorial Series

Frame is a simple Reaktor sampler I built to implement a type of freeform looping and creative sampling I felt was missing from most other software samplers on the market. Frame allows you to define a window of sound and sweep it across the sample as it plays without glitching or popping. Depending on the size of the sample, the smoothness, the spacing, and whether or not you’ve turned up the position / length LFO, you can get results that are reminiscent of some of the great creative sampling musicians – well alright, this also requires skill and taste; all I’m doing here is removing one of the technical hurdles. 😉


Today we begin a series of tutorials that are going to start with picking apart and explaining Frame’s structure then move on to sound design and even modifying the structure – adding more modulations and even sequencing, perhaps. I’m open to suggestions!


First off, let’s have a look at the heart of the instrument, a grain cloud sampler. This module sometimes get a bad rap for eating CPU but it’s one of the most versatile and useful sampler modules in Reaktor and the CPU use can be tamed. Here in the grain cloud sampler module’s properties, I’ve set “overlap” to 1 rather than the default 32. Right away that eliminates a ton of CPU usage.

The trick here is, each note will correspond to a single grain of sampled sound, which allows us to juggle individual grains using Reaktor’s voice logic. In fact, each grain can now be thought of as a slice or loop. We’ll look at how to leverage this in upcoming Frame tutorials.

I’ve clicked on the grain cloud sampler module below which shows all the incoming and outgoing connections highlighted in blue. Notice that I’m not using any of the built in jitter controls, which in my humble opinion can create a stereotypical Reaktor-ish sound which I’d like to avoid; there are other ways to modulate the same parameters that afford better control over the character of the sound.

Starting at the top, there are gate and pitch controls. The gate restarts playback of grains at the G input on the grain cloud sampler, and also triggers an envelope that is connected to multiplier modules to control the sound’s attack, decay, sustain and release.

A tuning macro provides coarse and fine tuning. Here’s what’s inside it:

You may well wonder, why is 60 being subtracted from the incoming MIDI signals? It’s to simplify the process of sample mapping. Frame doesn’t work like a Kontakt style sampler, where typically an instrument like a piano or bassoon is sampled in different key ranges which are mapped across the sample map. Instead, it’s designed to place one sample in each slot (or key) on the map, up to 127 samples, and a sample is selected and played back within a narrow range – you will probably want to stay within an octave of middle C upwards or downwards unless you’re going for particular special effects. And instead of playing one-shots like an emulated instrument, you will want to use samples of short musical phrases, beats, field recordings and such.

TL;DR version: think of pitch zero as neutral, and negative and positive pitch values as repitching the sample upwards and downwards.

An important feature here: the sample select knob, with values that run from 0 to 127, is added to the pitch – so when sample 7 is selected, 7 semitones are added to the playback pitch of the note. Why is this? It’s done in order to simplify the addition of notes to the Frame sample map, which looks like this:

Each note in the sample map has a root which starts at 0 for the first sample and counts up from there. So sample 7 has a root pitch with the MIDI value of 7. In order to play it back unpitched, it has to play back at a MIDI pitch of 7. When adding samples to Frame, it’s important to have “move root with low note” ticked in this menu:

Fortunately, unless you’re hacking Frame or designing your own sampler from scratch, you don’t have to think much about this – just add samples consecutively to the sample map and start playing.

And this is what I want you to do now – start playing Frame. All the controls are tool tipped so it should be self documenting. Try different sorts of sampled material – 5 to 10 seconds at a time works best – and especially try different smoothness, LFO and envelope settings. You will be surprised at how much sculpting you can do on a single sample with just those controls.

Frame is free and can be downloaded here. As with the other instruments I’ve created for Reaktor, it requires a full installation of Reaktor 5.8. Importing samples is easy and follows the same procedure as its big brother Loupe, a process documented here.

Guest Review: BitRate by Icebreaker Audio

 This is a guest review of Icebreaker Audio’s BitRate ensemble for Reaktor that was originally posted on the KVR forums by Sendy (Alexandra Cornhill). BitRate is a first-rate lo-fi tool and this is a well written review so I asked for permission to repost it here rather than seeing it scroll off into forum infinity. – Pete

BitRate – Verdict: 9/10

If you have an interest in chip music and have Reaktor, just get this now. If you’ve got any doubts beforehand, check out the audio demos and then buy it. This is living the dream – the dirty, pixelated, large-grain-parametered, limited yet limitless dream which is working with 8-bit and lo-fi gaming audio devices.


I’m a fond user of Plogue Chipsounds, and pretty much the only thing Chipsounds got wrong was that it was a tad too academic if you wanted to really reach into its guts and pull moves like Hubbard. While it would have taken Hubbard painstaking hours of tapping away on a machine code monitor to create his best patches, having to do so in this day and age, can be offputting for some. While BitRate is nowhere near as flexible as Chipsounds, it turns the academic problem on its head, allowing you to get experimenting and grooving right away. And in accordance with its GUI it has all the fun of making music on a portable handheld device.

Presumably the name BitRate comes from the fact that most sounds are derived from a master clock or pulse, which interacts with the frequencies its tone generators are asked to produce, creating plenty of grit. This aspect of the instrument really comes over as sounding authentic and all of your sound production decisions are limited in ways similar to the original hardware that inspired it – for example, the pulse wave can only produce four pulsewidths – the envelope rates are quite coarse on a lot of modules, often you’ll get a rhythmic clicking sound around the attack or release which under normal circumstances would be annoying, but in this case just adds to the delightful abandonment of Hi-Fi sensibilities that working with outmoded technology embodies. And having less resolution to tweak things often means you spend less time tweaking and more time rocking out. There’s a lot you just can’t do, like assignable envelopes or LFOs, though this is made up for somewhat by providing two step sequencer modulators per sound. These are quite limited because you can’t create smooth transitions, but it’s enough to really open up the sound possibilities and add expressiveness and variety to your sounds.

So, the sounds are authentic and tweakable enough to allow you to apply your vision to them. The NES is represented in full, as is the Gameboy’s wave channel (which you can modulate for cheap-arse wavesequencing fun!), cruddy 2-op FM from the Dos days also makes an appearance, as do cheap sampled Casio-style percussion sounds (which can even be circuit-bent… one parameter is called “Crap out” which is good for making the sound, well, crap out!). The final bunch of sound varieties come from the Glitch modules, which use experimental clocked oscillators in various configurations of cross-modulation and filtering. The results are simultaneously very unique and yet immediately suitable to their context.

One gripe with the modulation section – and this was pretty much one of the only problems I had that I considered down to bad design – when you choose a Wave channel to work with, you’re given 16 waveforms which you can modulate between. However, if you set the modulation range to maximum, and create a ramp up and down, not every wave will get a chance to play, because there are actually more waveforms than there are possible modulation values! To make matters more annoying, it took me a little bit of scienceing to work out that… get this… waves 0, 2, 4, 6, 8, 9, 11, 13, and 15 are the ones that can be visited, and the other waves are virtually irrelevant unless you gang modulations in a complex way or reduce the modulation range – but then you have even less waves to work with, so why would you do that? It’s just really unintuitive but now I’ve explained it, it’s not a problem anymore. Go me!

Finally, the GUI and sequencing options play their role perfectly. As I’ve said before, the graphics really give you that “I’m working on an old handheld” feeling. Parameters and modulation options are quite granular, you have only four patterns to work with and limited resolution… But oddly these limitations, which I didn’t like much at first, do their job wonderfully of giving you that sonic aesthetic associated with chip music. You’ll be banging out Megaman stage themes and soundtracks for long-lost platformers before you know you’ve even learned how to use it. And if you want to get more complex, my advice is to layer instances, and/or sample your work in BitRate and arrange and augment it in your DAW.

Should you fail miserably, lose all your lives and get a Game Over in your quest for epic 8-bit beats, the presets are pretty killer, too, so there’s always that to fall back on.

Here are some more audio demos of BitRate:

Boscomac updates Wurlitsar, Claviness

Boscomac, if you don’t know him already, is the creator of a treasure trove of Reaktor ensembles, both effects and instruments, from the traditional to the extreme. The one thing they all have in common is beautiful sound and beautiful photorealistic interfaces.

Now there are new versions of Claviness and Wurlitsar, two of his keyboard oriented instruments. Go get ’em! And don’t forget to leave something in the tip jar!

Carbon 2 modification in the library

Reaktor user Alexander Haberer has created a reskinned and sonically modified version of the Carbon 2 ensemble, called My Carbon, that features a healthy quantity of very usable snapshots organized into categories – bass, lead, pad, FX and keys.

I just checked and it plays very nicely with my Chroma sequencer, particularly with the legato glide patches. Load it in a separate instance of Reaktor rather than pasting the instrument into Chroma, though, because My Carbon’s snaps are stored at the ensemble level rather than in the instrument.

Loupe 2 Release

After a long wait and several delays – one of which was caused by the addition of a delay mode, ironically – I present Loupe 2.

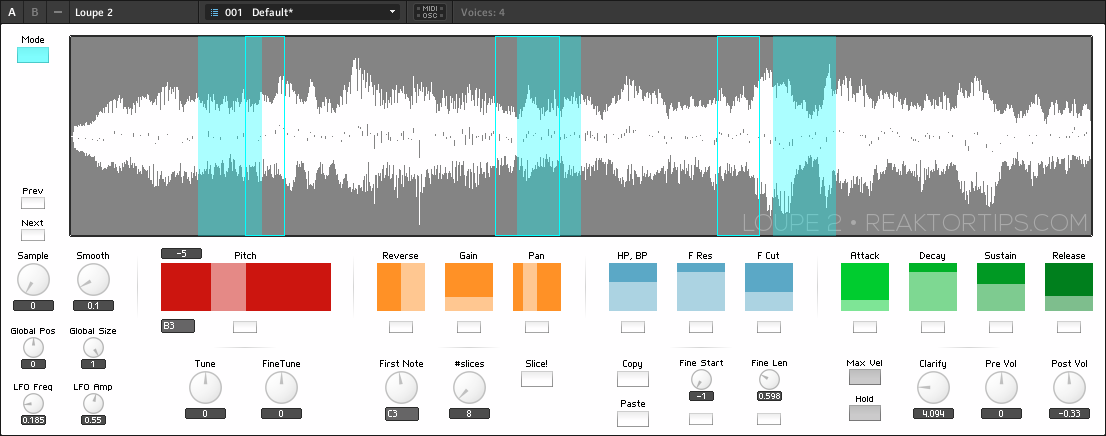
What is Loupe? It’s a Reaktor ensemble that assigns freeform sections of a sample to different MIDI notes and allows them to be pitched, reversed, resized, filtered and enveloped individually. The incoming MIDI notes do not repitch the sample directly , but you can manually adjust each slice / key’s tuning to create more complex melodic variation out of your source sample.

It works fantastically well to transform and remix a five to ten second musical phrase, a beat loop, a few seconds of a full song, or even a field recording of a drunk guy swearing at a lamp post. There is music lurking everywhere, sometimes in other music, sometimes in the notes between the notes, in the hissy crackle of decaying note tails on old vinyl samples, and Loupe will help you find it.

There are slice copy and paste buttons, so you can create slices with small variations on different keys or in different octaves. This video provides an introduction to Loupe in general as well as the new features in version 2:

Update May 8, 2013: Loupe 2.0.1 now has a per-slice “single shot” option so a slice plays only once even if you hold down the note. This is much more useful for sliced beats especially. I’ve added a few snaps to showcase the one shot feature.

There is also an improved button style for both the “reverse” and “single shot” controls – just click on ’em instead of clicking and dragging.

Also, I’ve added an envelope to the slice animation, so the markers fade in and out with the envelope. It’s a subtle difference but looks pretty snazzy.

I will have more info and demos soon regarding the new features but I wanted to get this update out to the user base ASAP. Download links have been updated and the Loupe 2 password you received will decrypt this update. Enjoy!


It is super CPU friendly! On my 4 year old Core 2 Duo iMac, it uses around 6% CPU with four voices – that’s 6% of one core, mind. If you want to use more voices, just adjust the instrument properties tab, but I find four is a nice balance since sampled material tends to be timbrally rich to begin with and you probably don’t want too many voices playing at once.

Loupe 2 improvements

  • Autoslicing function – set base note, number of slices, and hit the slice button to automatically map sample segments across the keyboard. Works great on beatloops as well as melodic material!
  • New GUI with color coded per-slice parameters and polyphonic slice markers mapped across the waveform display
  • Visual feedback showing the effect of position LFO
  • Improved slice reverse function
  • Delay mode: slice parameters, repitching, slice areas, filter, reverse and envelope can be mapped to live audio, with buffer freeze features
  • A one-knob “clarify” control rolls off the bass and boosts treble so your samples sit better in the mix
  • MIDI mappable per-slice fine start and length controls allow you to fine tune slice position from a MIDI controller without reaching for the mouse
  • A new Hold control sustains struck notes, freeing your hands to perform with the global controls
  • TouchOSC iPad template is included in the archive
  • Improved slice position LFO and other small tweaks and bugfixes
loupe+2

First of all, it looks nicer! I don’t know about you but to me looks matter and I find I use a tool more if it’s visually appealing. The controls have been rearranged into more logical groupings.

There is a new autoslice feature. Select a first note and a number of slices and Loupe will slice the sample into that number of slices and assign the slices to that note and the subsequent notes going upward on the keyboard. Let’s say you create twelve slices from middle C upwards. If you then slice from the C above middle C upwards in 16 slices, the previously sliced middle C range will be undisturbed. The “set all” controls below the per-slice parameters have also been modified to only affect the currently selected range. Note: in the presets in Loupe 2, I’ve used the the 16 notes from middle C upwards.

Naturally, you can still assign freeform loop segments by dragging on the waveform with the mouse. There are also fine start and fine length controls that are easily MIDI-assignable – after slicing a wave into even chunks, you can use a MIDI (or OSC) controller to play one note after another and fine tune the per-loop position and size from your control surface.

The reverse control now reverses the exact current area of a slice, instead of flipping over to the area prior to the current slice area. I find this is more intuitive and is what users expect from a reverse control. It also works a lot better with drum loops. Why didn’t it work this way in the first place? Mea culpa, gentlemen, mea culpa.

There is now a “clarify” control that drops the bass and boosts the treble, a one gesture EQ effect that I often use to help a sampled musical phrase fit into a new track and stand out without muddying the mix.

Another HUGE change is the new delay mode:

There’s also a number of small bugfixes and enhancements – little persnickety things I discovered as I overhauled the instrument – as well as new samples and presets, though if Loupe is the kind of instrument that appeals to you, you will certainly want to import your own samples and create your own sounds. Loupe is a creative tool, not a rompler. If you have a few gigabytes of field recordings and choice vinyl and tape samples, have I got the tool for you
!

Loupe 2 can be yours for $20 USD. Buy Loupe 2 now by clicking here:

Add to Cart

The encrypted archive for Loupe 2 can be downloaded here. When you buy, you will be emailed a code to unlock the archive. Please provide a valid email address!!

Loupe 2 is a Reaktor instrument and requires a full installation of Reaktor 5.8.0 or newer. It will not work with Reaktor Player.

 –

Loupe 2 with its major new features is a separate instrument from Loupe 1 and it won’t be a free upgrade to Loupe 1 users. I am however introducing an amnesty period – if you bought Loupe anytime from September 2012 until now, you get Loupe 2 for free. Please be patient as I send out updates.

Now, what about my other sampling instruments – Mirage and Paramdrum? Am I going to upgrade them to “version 2” with major new features and charge again? No, but I will be reskinning them with the new look, plus a few minor tweaks, as point releases in the near term.

 –

Special thanks to Felix Petrescu of Makunouchi Bento for his invaluable assistance beta testing as well as acting as a software muse, pushing for features that have made Loupe a better instrument.

Mac users: I’ve been getting complaints from people using Stuffit Expander to decrypt the Loupe 2 archive. In my humble opinion, Stuffit Expander is five pounds of shit in a two pound bag. To open a password protected RAR file use one of these:

http://wakaba.c3.cx/s/apps/unarchiver.html (recommended)
http://www.macupdate.com/app/mac/21430/simplyrar 

Forgot to add: Loupe 2 comes with TouchOSC support – a template is included in the package. Set up bi-directional OSC,  and selecting a slice in Loupe updates the controls on the iPad which is… pretty cool.

Loupe 2.0.2 bugfix now available – corrected a problem with auto-slicing where moving the slice # control after slicing would change the sample position.