This is a quick video tutorial on adding samples to Frame 3, my free creative sampler for Reaktor which you can download here, where you will also find Part 1 of the tutorial. Part 2 is here.
Update: just got a great idea from a KVR forum member: adding unison effects to Frame 3. It’s very easy – simply bump up the number of voices in the instrument’s function palette tab, and set the min / max to a factor of the voice count. Here for example, each note you play will have four voices. Play with the “spread” control too, which determines the amount of detune between unison voices.
Hi Reaktorists! I hope our American friends have had a great Memorial Day weekend and are back in the office or classroom, ready to slack off at their desks and learn more about Reaktor. 😉
Today we’re going to look at the mechanisms by which Frame 3 sets sample playback position and length. Don’t have Frame 3 yet? It’s a free download here, where you can also get part 1 of the tutorial. So let’s drill down into the structure.
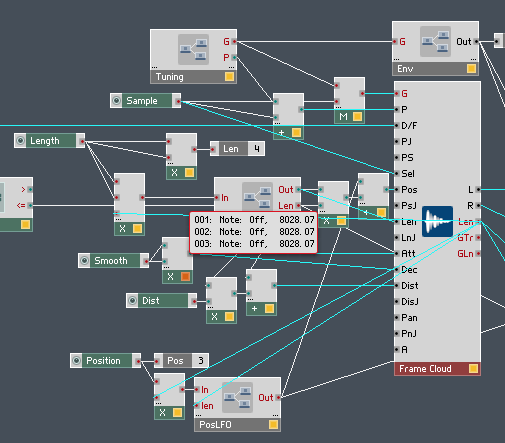
First off, notice that the grain cloud sampler module (here labeled Frame Cloud – you can usually rename these things in the properties) has a “Len” output port. This sends out the length of the sample in milliseconds when a different sample is selected or played back. I’ve highlighted the “Len” port and relevant wire here, and turned on wire debugging so we can hover the mouse to see the values the connection is sending.
The Len value goes to a multiplier where it is scaled by the Length control. If you multiplied the value from Len by a value between zero and one, you would get a potential length from zero to the maximum possible length of that particular sample. We can do something more useful, though, by setting different min and max values for that control:
Here, the Min value is 0.05, because we don’t want to scale the sample playback length all the way down to zero. Having done some trial and error experimentation, 0.05 is about right for samples composed of short musical phrases, 5 to 10 seconds long. Feel free to experiment with this though, as slight changes to very small grain lengths in a granular sampler can yield vastly different tones.
The Max value is set to 0.5 – however, notice that the value from the Length knob multiplies the sample length twice, giving us a nonlinear curve. This makes it easier to get smaller length values by tweaking the knob. (more on basic math in Reaktor here) The maximum length with a value of 0.5 is a quarter of the sample length. If you want a longer sample playback window, changing this value to 0.6 to get a max length a little more than one third the length of the sample works well too.
The Len output also gets scaled by the Position knob to set the playback position. Here are the properties for the Position control:
This is a straight zero to one, and it’s only multiplied by Len once, because we want the full range of travel of the length of the sample and we want the travel to be linear. However, notice that the mouse resolution is turned up to 1022 and there’s a very small step size.
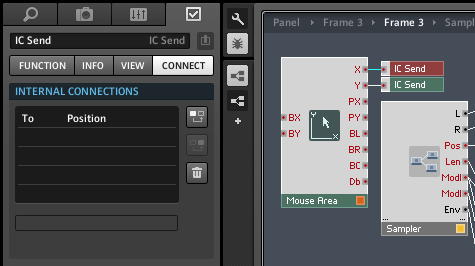
Popping up one level in the structure, here’s a mouse area module, which appears (or more strictly speaking, doesn’t appear!) on the front panel of the instrument as a transparent overlay over the waveform display. The mouse area will appear greyed-out and visible when the panel is unlocked, allowing you to move and scale it, but becomes transparent and invisible when the panel is locked, unless you’ve altered its properties in the view tab.
The point of the mouse area is to allow you to click and drag on the waveform to set the position and length of the sample playback area. Instead of connecting directly to the sampler module, the mouse area uses two IC Send modules to connect to the position (X) and length (Y) controls on the front panel. That way, clicking and dragging to move the playback window also moves the knobs and keeps everything in synch.
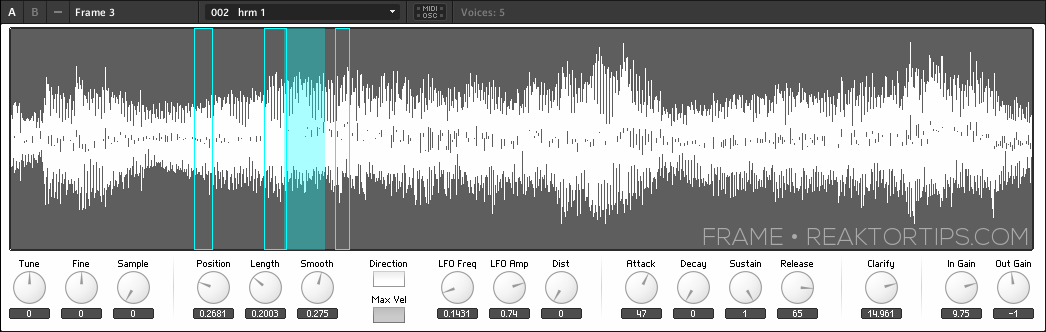
The two other important things to note about the position and length controls is that they can be modulated by the LFO macros, and that the current position and length are shown by translucent blue-green indicators on multi and poly display modules. We’ll look at the how and why of that in upcoming installments of the Frame 3 tutorial series.
That’s all for today, so in the meantime experiment and explore, and enjoy.
ADDENDUM: Reaktor Tips reader BD noticed that some of the parameters in Frame weren’t mappable in Ableton Live. Here’s how to fix that. Number one, click on the Frame 3 title bar so the instrument is focused:
Number two, on the instrument properties “connect” tab, in the IDs menu at the bottom, do an “instrument down” and then a “sort and compress IDs”.
Sadly, this will likely undo any mappings you’ve already done in your DAW, but there aren’t many in this instrument and after this procedure you will be able to map them all. Make sure to save the instrument so you don’t have to do this again next time. I’ve updated the downloadable file but have included these instructions because a) it’s handy to know, and b) you’ve probably already saved your own modified versions of Frame 3 by now with your own snaps and sample maps.
Frame is a simple Reaktor sampler I built to implement a type of freeform looping and creative sampling I felt was missing from most other software samplers on the market. Frame allows you to define a window of sound and sweep it across the sample as it plays without glitching or popping. Depending on the size of the sample, the smoothness, the spacing, and whether or not you’ve turned up the position / length LFO, you can get results that are reminiscent of some of the great creative sampling musicians – well alright, this also requires skill and taste; all I’m doing here is removing one of the technical hurdles. 😉
Today we begin a series of tutorials that are going to start with picking apart and explaining Frame’s structure then move on to sound design and even modifying the structure – adding more modulations and even sequencing, perhaps. I’m open to suggestions!
First off, let’s have a look at the heart of the instrument, a grain cloud sampler. This module sometimes get a bad rap for eating CPU but it’s one of the most versatile and useful sampler modules in Reaktor and the CPU use can be tamed. Here in the grain cloud sampler module’s properties, I’ve set “overlap” to 1 rather than the default 32. Right away that eliminates a ton of CPU usage.
The trick here is, each note will correspond to a single grain of sampled sound, which allows us to juggle individual grains using Reaktor’s voice logic. In fact, each grain can now be thought of as a slice or loop. We’ll look at how to leverage this in upcoming Frame tutorials.
I’ve clicked on the grain cloud sampler module below which shows all the incoming and outgoing connections highlighted in blue. Notice that I’m not using any of the built in jitter controls, which in my humble opinion can create a stereotypical Reaktor-ish sound which I’d like to avoid; there are other ways to modulate the same parameters that afford better control over the character of the sound.
Starting at the top, there are gate and pitch controls. The gate restarts playback of grains at the G input on the grain cloud sampler, and also triggers an envelope that is connected to multiplier modules to control the sound’s attack, decay, sustain and release.
A tuning macro provides coarse and fine tuning. Here’s what’s inside it:
You may well wonder, why is 60 being subtracted from the incoming MIDI signals? It’s to simplify the process of sample mapping. Frame doesn’t work like a Kontakt style sampler, where typically an instrument like a piano or bassoon is sampled in different key ranges which are mapped across the sample map. Instead, it’s designed to place one sample in each slot (or key) on the map, up to 127 samples, and a sample is selected and played back within a narrow range – you will probably want to stay within an octave of middle C upwards or downwards unless you’re going for particular special effects. And instead of playing one-shots like an emulated instrument, you will want to use samples of short musical phrases, beats, field recordings and such.
TL;DR version: think of pitch zero as neutral, and negative and positive pitch values as repitching the sample upwards and downwards.
An important feature here: the sample select knob, with values that run from 0 to 127, is added to the pitch – so when sample 7 is selected, 7 semitones are added to the playback pitch of the note. Why is this? It’s done in order to simplify the addition of notes to the Frame sample map, which looks like this:
Each note in the sample map has a root which starts at 0 for the first sample and counts up from there. So sample 7 has a root pitch with the MIDI value of 7. In order to play it back unpitched, it has to play back at a MIDI pitch of 7. When adding samples to Frame, it’s important to have “move root with low note” ticked in this menu:
Fortunately, unless you’re hacking Frame or designing your own sampler from scratch, you don’t have to think much about this – just add samples consecutively to the sample map and start playing.
And this is what I want you to do now – start playing Frame. All the controls are tool tipped so it should be self documenting. Try different sorts of sampled material – 5 to 10 seconds at a time works best – and especially try different smoothness, LFO and envelope settings. You will be surprised at how much sculpting you can do on a single sample with just those controls.
Frame is free and can be downloaded here. As with the other instruments I’ve created for Reaktor, it requires a full installation of Reaktor 5.8. Importing samples is easy and follows the same procedure as its big brother Loupe, a process documented here.
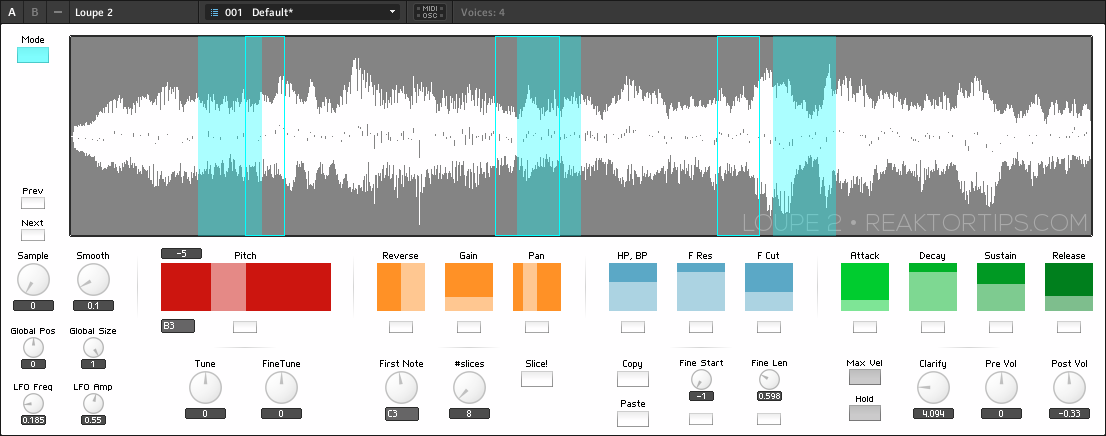
After a long wait and several delays – one of which was caused by the addition of a delay mode, ironically – I present Loupe 2.
What is Loupe? It’s a Reaktor ensemble that assigns freeform sections of a sample to different MIDI notes and allows them to be pitched, reversed, resized, filtered and enveloped individually. The incoming MIDI notes do not repitch the sample directly , but you can manually adjust each slice / key’s tuning to create more complex melodic variation out of your source sample.
It works fantastically well to transform and remix a five to ten second musical phrase, a beat loop, a few seconds of a full song, or even a field recording of a drunk guy swearing at a lamp post. There is music lurking everywhere, sometimes in other music, sometimes in the notes between the notes, in the hissy crackle of decaying note tails on old vinyl samples, and Loupe will help you find it.
There are slice copy and paste buttons, so you can create slices with small variations on different keys or in different octaves. This video provides an introduction to Loupe in general as well as the new features in version 2:
Update May 8, 2013: Loupe 2.0.1 now has a per-slice “single shot” option so a slice plays only once even if you hold down the note. This is much more useful for sliced beats especially. I’ve added a few snaps to showcase the one shot feature.
There is also an improved button style for both the “reverse” and “single shot” controls – just click on ’em instead of clicking and dragging.
Also, I’ve added an envelope to the slice animation, so the markers fade in and out with the envelope. It’s a subtle difference but looks pretty snazzy.
I will have more info and demos soon regarding the new features but I wanted to get this update out to the user base ASAP. Download links have been updated and the Loupe 2 password you received will decrypt this update. Enjoy!
It is super CPU friendly! On my 4 year old Core 2 Duo iMac, it uses around 6% CPU with four voices – that’s 6% of one core, mind. If you want to use more voices, just adjust the instrument properties tab, but I find four is a nice balance since sampled material tends to be timbrally rich to begin with and you probably don’t want too many voices playing at once.
Loupe 2 improvements
Autoslicing function – set base note, number of slices, and hit the slice button to automatically map sample segments across the keyboard. Works great on beatloops as well as melodic material!
New GUI with color coded per-slice parameters and polyphonic slice markers mapped across the waveform display
Visual feedback showing the effect of position LFO
Improved slice reverse function
Delay mode: slice parameters, repitching, slice areas, filter, reverse and envelope can be mapped to live audio, with buffer freeze features
A one-knob “clarify” control rolls off the bass and boosts treble so your samples sit better in the mix
MIDI mappable per-slice fine start and length controls allow you to fine tune slice position from a MIDI controller without reaching for the mouse
A new Hold control sustains struck notes, freeing your hands to perform with the global controls
TouchOSC iPad template is included in the archive
Improved slice position LFO and other small tweaks and bugfixes
First of all, it looks nicer! I don’t know about you but to me looks matter and I find I use a tool more if it’s visually appealing. The controls have been rearranged into more logical groupings.
There is a new autoslice feature. Select a first note and a number of slices and Loupe will slice the sample into that number of slices and assign the slices to that note and the subsequent notes going upward on the keyboard. Let’s say you create twelve slices from middle C upwards. If you then slice from the C above middle C upwards in 16 slices, the previously sliced middle C range will be undisturbed. The “set all” controls below the per-slice parameters have also been modified to only affect the currently selected range. Note: in the presets in Loupe 2, I’ve used the the 16 notes from middle C upwards.
Naturally, you can still assign freeform loop segments by dragging on the waveform with the mouse. There are also fine start and fine length controls that are easily MIDI-assignable – after slicing a wave into even chunks, you can use a MIDI (or OSC) controller to play one note after another and fine tune the per-loop position and size from your control surface.
The reverse control now reverses the exact current area of a slice, instead of flipping over to the area prior to the current slice area. I find this is more intuitive and is what users expect from a reverse control. It also works a lot better with drum loops. Why didn’t it work this way in the first place? Mea culpa, gentlemen, mea culpa.
There is now a “clarify” control that drops the bass and boosts the treble, a one gesture EQ effect that I often use to help a sampled musical phrase fit into a new track and stand out without muddying the mix.
Another HUGE change is the new delay mode:
There’s also a number of small bugfixes and enhancements – little persnickety things I discovered as I overhauled the instrument – as well as new samples and presets, though if Loupe is the kind of instrument that appeals to you, you will certainly want to import your own samples and create your own sounds. Loupe is a creative tool, not a rompler. If you have a few gigabytes of field recordings and choice vinyl and tape samples, have I got the tool for you…!
Loupe 2 can be yours for $20 USD. Buy Loupe 2 now by clicking here:
The encrypted archive for Loupe 2 can be downloaded here. When you buy, you will be emailed a code to unlock the archive. Please provide a valid email address!!
Loupe 2 is a Reaktor instrument and requires a full installation of Reaktor 5.8.0 or newer. It will not work with Reaktor Player.
–
Loupe 2 with its major new features is a separate instrument from Loupe 1 and it won’t be a free upgrade to Loupe 1 users. I am however introducing an amnesty period – if you bought Loupe anytime from September 2012 until now, you get Loupe 2 for free. Please be patient as I send out updates.
Now, what about my other sampling instruments – Mirage and Paramdrum? Am I going to upgrade them to “version 2” with major new features and charge again? No, but I will be reskinning them with the new look, plus a few minor tweaks, as point releases in the near term.
–
Special thanks to Felix Petrescu of Makunouchi Bento for his invaluable assistance beta testing as well as acting as a software muse, pushing for features that have made Loupe a better instrument.
Mac users: I’ve been getting complaints from people using Stuffit Expander to decrypt the Loupe 2 archive. In my humble opinion, Stuffit Expander is five pounds of shit in a two pound bag. To open a password protected RAR file use one of these:
Forgot to add: Loupe 2 comes with TouchOSC support – a template is included in the package. Set up bi-directional OSC, and selecting a slice in Loupe updates the controls on the iPad which is… pretty cool.
–
Loupe 2.0.2 bugfix now available – corrected a problem with auto-slicing where moving the slice # control after slicing would change the sample position.
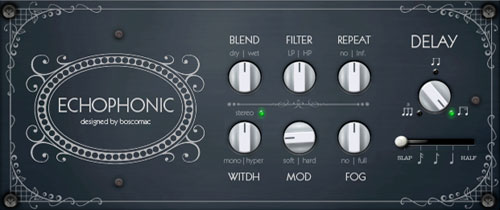
I found a terrific little dubby echo here courtesy of Boscomac and decided to hotwire it into my Paramdrum ensemble.
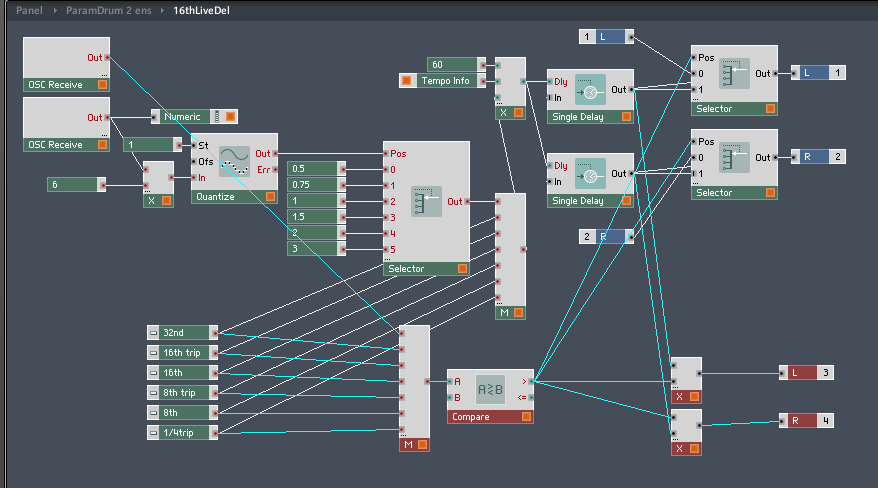
I added a router to the beat delay like so:
Whenever one of the beat repeat buttons is engaged, the “compare” module detects that its output is greater than zero – this changes the multiplier from zero to one on the extra outputs where the sound is directed to the Echophonic effect. If you have ParamDrum it’s a quick and easy modification. This way, the dry signal doesn’t normally go through the Echophonic and it becomes a haze that drifts around the stuttering when you engage the beat repeat.
This is one of the many reasons I like Reaktor rather than compiled VSTs – you can do little tweaks like this to existing ensembles as the mood strikes you. Here’s how it sounds:
This uses the samples from an earlier edition of Paramdrum, the TR edition, which has a sample map of simpler, cleaner drum hits – analogue sounding but with a morphing twist. You can download the TR edition samples for free here. Of course, I think they sound best in Paramdrum. 🙂
Like what you’re hearing? Buy Paramdrum here. (You need a full working installation of Reaktor 5 to use this instrument, not just Reaktor player)
(Download Boscomac’s Echophonic effect free here – he has lots of other very cool goodies too)