Category Archives: Roux

Sequenced Ensembles by David Elson

Reaktor friends, you should check out what David Elson is up to in the user library.

1521268_4984.Screen_Shot_2015-04-30_at_13.59.18

1521268_5139.Screen_Shot_2015-05-15_at_10.38.18

David has taken my Roux sequencer macro and run with it, and is doing things with it that are very interesting. Sequencing granular parameters? Sequencing beats? Hell yeah, that’s what you do with it. His choice of sampled material and sound design for the Slicer ensemble is particularly nice, too.

Basic Sequencer for Anything in Reaktor: The Roux, Part 1

This is part of a set of tutorials I did for Peter Kirn’s Kore site back in 2008 – we were creating materials that highlighted Native Instruments products and how they could be used in Kore. Well, the product is defunct and the old site is down, so here is the first in a series on the Roux sequencer macro, showing how it can be used to manipulate the read position in a basic grain delay. Also see here where I’ve built an updated version of the Roux macro that is used in this tutorial.

Update: hey, this is back online now at kore.noisepages.com! Awesome!

rouxscreen

Here is an index to the series:

In French cooking, there’s a sauce base called a roux (pronounced “roo”) that is the foundation of bechamel and other sauces. This is a sequencer macro that is the equivalent for programming sequenced instruments in Reaktor – you can take it in any direction from here. In its most basic form it can send velocity information to trigger percussion, or modulate instrument parameters like cutoff and resonance. With a few simple changes it becomes a pitch sequencer.

I decided to teach how to use the roux step sequencer before diving into the guts of the Frankenloop because understanding this will make that much easier to untangle. Besides, this is a more modular-ready macro, easily popped into anything else you happen to be building or toying with – anything that could use some sauce, really.

I decided to teach how to use the roux step sequencer in a practical way before diving into the guts because understanding this will make that much easier to untangle. Besides, this is a more modular-ready macro, easily popped into anything else you happen to be building or toying with – like the granular delay we’ve been working on. Anything that could use some sauce, really.

In part one, we look at two uses of this versatile basic ingredient. Download the ensemble and follow along with the video tutorial.

Roux Sequencer Macro for Reaktor from Create Digital Media on Vimeo.

Download a Reaktor Step Sequencer (Roux macro series)

It’s been a while since I published the Roux II sequencer macro, which I’d promised to expand on with some further tutorials, so let’s get back on it!


A user emailed me an ensemble where he’d used two Roux II sequencers to create a step sequencer with pitch. However, it wasn’t working as he’d expected. Why not? Let’s take a look at his structure:

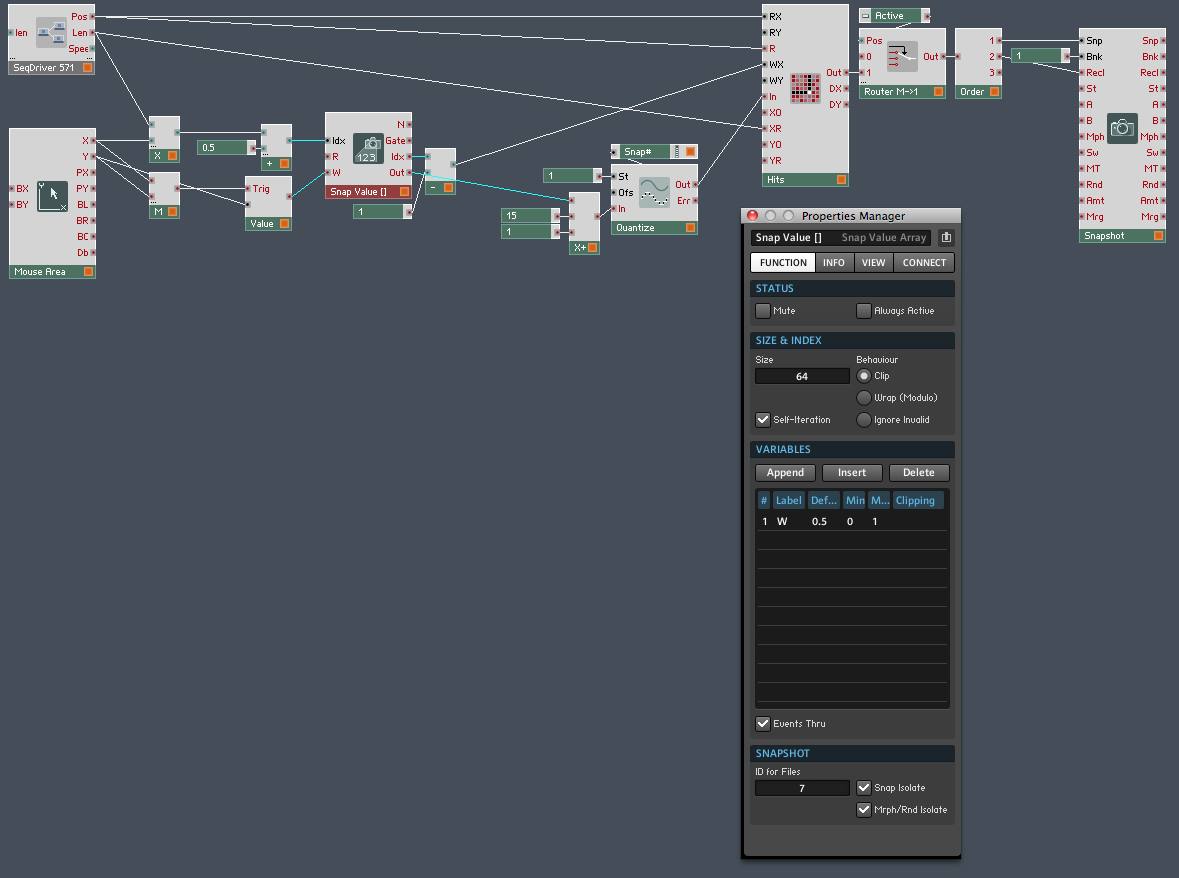
 This looks fine at first glance. One Roux is driving the gate input on an envelope, another is driving the pitch input on a Sine module. The sequencer driving Pitch has been modified so its values go from 0 to 127 – the standard range of MIDI note values – instead of 0 to 1. Here’s what that looks like in the properties for the mouse area:

And in the table:

But the envelope doesn’t retrigger as expected, and the pitch triggers even when the gate doesn’t. Another problem, both cosmetic and functional, is that the tiny height of the pitch sequencer doesn’t give you much room to accurately enter values with the mouse!

So in my version I’ve made a larger pitch sequencer area.

It’s easy to change the size of the mouse area and table by using the view tab on the properties of these panel elements. If you want even more room, just set the width and height of these modules to a larger number of pixels – but make sure they match, so the mouse area fully overlies the table module on the panel.

As you can see I’ve also added a constrain-to-scale macro borrowed from the factory library Spiral sequencer for a quick way to restrict the notes to a particular scale. Now let’s have a look at the changes in the structure.

What I’ve changed in my version:

  • Pitch and Gate macros have been renamed for clarity
  • All macros and modules have been set to mono. There are certainly ways to make poly sequencers in Reaktor but polyphony doesn’t make sense for this kind of simple structure.
  • The DR envelope is replaced with an ADSR. The DR envelope requires a zero value in between triggers, while the ADSR only requires a positive value to trigger, which makes more sense in a step sequencer where you’ll have one note after another.
  • Separator and Value modules send pitch values only when the gate value is on.
  • A Start / Stop module to send a zero to the envelope when the sequencer stops
  • Triangle wave for some extra harmonics to the sound
  • Mixer to control volume
  • the aforementioned Pitch Correction macro from Spiral
  • Added a synced stereo delay, to make things a little more interesting

Aside from the innards of the constrain-to-scale and delay macros, most of this should be straight-forward, but I want to talk a little more in depth about the use of the separator and value modules. The output of the Gate sequencer, which controls whether there’s a note on a certain step and how loud it is, goes through a separator. That way, only positive non-zero values of the gate trigger a new pitch.

Which brings us to the value module – the pitch is held back at the input of the value module until the “Trig” port receives a gate. If this weren’t in place, every pitch value would go through and you’d hear a glissando effect – notes between your desired notes – when setting high decay and / or release values on the envelope.

You’re probably also wondering about the start / stop and separator modules. What’s up with that?

The Start / Stop sends a 1 from its G output port when the clock is running – either Reaktor’s clock when standalone, or the host’s clock when running as a plugin – and sends a 0 when the clock stops. I’m using a separator module again, but this time we’re taking the value from the “Lo” output port, because we only want the zero. And the reason we want the zero is to send it to the G input on the envelope, to stop hanging notes from droning on forever.

Notice that the Separator module has two input ports – an “In” and a “Thld”. The threshold port determines what values go to the Hi and Lo outputs. When there’s nothing connected to Thld, Reaktor interprets this as a zero threshold. So values greater than zero go to Hi, and values of zero or less go to Lo.

One thing you’ll notice about this contraption is that it can have different sequence length and clock speed settings in the pitch and gate sequencers, one of the features you’ll also find on its big brother the Chroma sequencer. This lets the sequence morph and change in interesting and unpredictable ways over time. My philosophy is, if you already know what your music is going to sound like before you produce it, why bother? Make tools that produce happy accidents.

The next thing you might want to try is adding some better sounding audio generating modules, like a choice of waveforms, a filter or two, a filter envelope, an LFO – and of course, more Roux sequencer macros to control some of these parameters. See my previous post here to download the Roux macro on its own, and find out how to use it in your structures.

The Roux step sequencer is free and you can download it from the Reaktor Tips shop here:

Add to Cart

The cost is zero and a link will be delivered to your inbox instantly. Plus, you’ll receive notification and another link when the Roux Stepper is updated with improved audio and sequencing features. Oh, and you’ll also get Ghost Shift, in case you don’t have it already.

Happy sequencing!

The Roux Sequencer Macro

Back in the day when I was blogging at the now-defunct kore.noisepages.com, I did a series on the inner structure of a basic sequencer macro, one that could be easily adapted for many uses. Those posts have vanished into the bit-ether, so I’m rebooting the topic with a revised macro and an ensemble that shows how to use it. And here it is! download link

All controls are tool tipped – there’s sequence length and clock speed controls, an IC send menu and value range controls – see below for details.

Last time around, I posted the macro and dived right into the inner structure, explaining it bit by bit from the inside out. I think this was useful but lacked a degree of… instant gratification. So this time around I’m going to start with a simple demo ensemble that shows how you can use it right off the bat.

This demo instrument is a rhythmic FM noisemaker that has three sequencer macros mapped to the volume, carrier pitch and modulation amount. The modulation oscillator pitch isn’t sequenced – it’s fun to map it to a MIDI or OSC controller and manipulate in real-time. You can get some fine Clicks and Cuts style sounds and sequences out of it. I’ve run it through the standard factory library Dual Sync Delay to wet the sound a bit. Here it is with a little ParamDrum beat behind it:

The Roux macro can be slapped into any Reaktor instrument, and doesn’t even require wiring stuff together. Using the IC send module, the signal can be routed to any target in an ensemble – such as knobs and faders in an existing instrument. It’s designed, therefore, for quick and dirty hot-wiring. Plop one into Carbon 2, for example, and add some sequencing to oscillator pitches and cutoff values.

One nice thing about the IC send module is that it displays a menu right on the front panel of the instrument that lets you direct the signal without mucking around in module properties. Another great thing is that it adapts the signal range to the target you’re aiming at – doesn’t matter whether the target has values from -12 to +12 or 0 to 127. As an added tweak, I’ve included min and max controls that will restrict the range, in case you want a target control’s travel limited to, say, the middle range – just set min to 0.4 and max to 0.6.

Now, why is this macro called the Roux? A roux is the basis for sauces in french cooking – it’s little more than flour fried in fat, and you can make gravies, cheese sauces, any kind of sauce where you want a little body and thickness. And just like the sauce base, this sequencer macro can be used in a lot of different ways, as the basis for different instrument designs.

In upcoming posts I’ll talk about other ways to use the macro, like triggering envelopes, build some new instruments with it, and we’ll take a peek under the hood at what makes it tick. Bon appetit!

I was raised to be a saucier. A great saucier.

Collaborative Building on Google Plus

As you may know, I’ve been kicking ass and chewing bubblegum working on a collaborative Reaktor project on the G+ Reaktor group. Our first project is to create a metasequencer by having one Roux macro modulate another.

Since it’s early in the new year and people are sluggishly recovering from the holidays I’ve gone ahead and done the assigned homework and here is a cheat sheet.

That’s the front panel – “Meta” is our modulator, and it modulates the “Roux” macro. There’s an “active” button to turn the metasequencing on and off, and a Snap# numeric readout to let you know which snapshot you’re selecting with the mouse in the meta-sequencer.

Which brings us to how Meta modulates Roux: it selects and recalls different snapshots. Here’s what it looks like inside:

As you can see, there’s some additional structure in this macro. Important note: the Snap Value [] array module, as you can see in its properties, is set to snap isolate and Morph/Rnd isolate. That’s because we don’t want it changing its own sequence as it recalls different snaps – we only want those events to select different sequences in the other Roux macro.

A couple of other things to note – the value coming out of the Snap Value [] module is scaled between 1 and 16 and quantized to integers. You can’t see it here but the event table has been modified to accept values between 1 and 16. This is perhaps not the optimal way to do this, as we have to change that max value of 16 in two places, but it’ll do for now. Why have a max value at all? It’s easier to select a value with the mouse that way. Again, there are other ways to do it, but later for that.

After the event table the values go through a router which is used to activate or deactivate the metasequencing, then into an order module which directs the values to the Snp and Recl input ports on a Snapshot module. This part should be self explanatory.

I could offer a download of the ensemble I built, but that defeats the purpose of collaborative building. I’d like anyone following along to build their own instrument / ensemble, come up with their own questions, and possibly their own ideas for improvement.

So get cracking!