Reaktor user Alexander Haberer has created a reskinned and sonically modified version of the Carbon 2 ensemble, called My Carbon, that features a healthy quantity of very usable snapshots organized into categories – bass, lead, pad, FX and keys.
I just checked and it plays very nicely with my Chroma sequencer, particularly with the legato glide patches. Load it in a separate instance of Reaktor rather than pasting the instrument into Chroma, though, because My Carbon’s snaps are stored at the ensemble level rather than in the instrument.
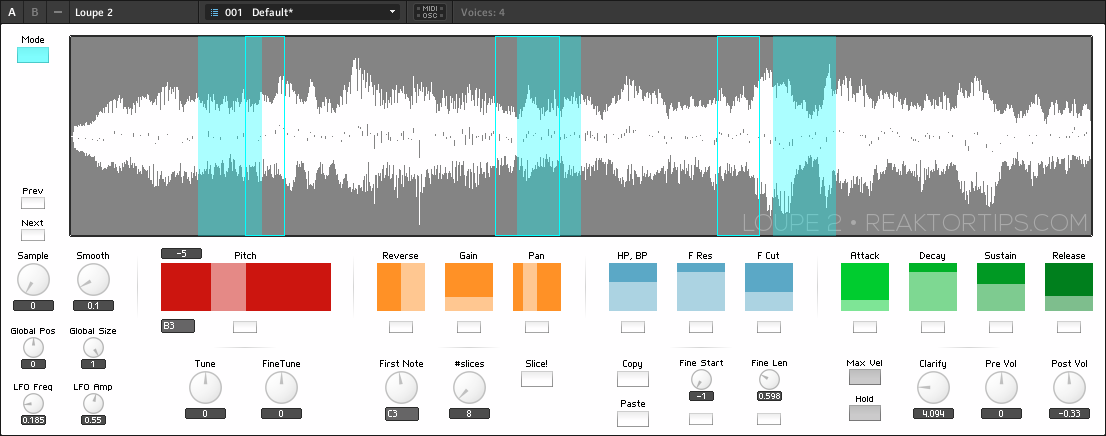
After a long wait and several delays – one of which was caused by the addition of a delay mode, ironically – I present Loupe 2.
What is Loupe? It’s a Reaktor ensemble that assigns freeform sections of a sample to different MIDI notes and allows them to be pitched, reversed, resized, filtered and enveloped individually. The incoming MIDI notes do not repitch the sample directly , but you can manually adjust each slice / key’s tuning to create more complex melodic variation out of your source sample.
It works fantastically well to transform and remix a five to ten second musical phrase, a beat loop, a few seconds of a full song, or even a field recording of a drunk guy swearing at a lamp post. There is music lurking everywhere, sometimes in other music, sometimes in the notes between the notes, in the hissy crackle of decaying note tails on old vinyl samples, and Loupe will help you find it.
There are slice copy and paste buttons, so you can create slices with small variations on different keys or in different octaves. This video provides an introduction to Loupe in general as well as the new features in version 2:
Update May 8, 2013: Loupe 2.0.1 now has a per-slice “single shot” option so a slice plays only once even if you hold down the note. This is much more useful for sliced beats especially. I’ve added a few snaps to showcase the one shot feature.
There is also an improved button style for both the “reverse” and “single shot” controls – just click on ’em instead of clicking and dragging.
Also, I’ve added an envelope to the slice animation, so the markers fade in and out with the envelope. It’s a subtle difference but looks pretty snazzy.
I will have more info and demos soon regarding the new features but I wanted to get this update out to the user base ASAP. Download links have been updated and the Loupe 2 password you received will decrypt this update. Enjoy!
It is super CPU friendly! On my 4 year old Core 2 Duo iMac, it uses around 6% CPU with four voices – that’s 6% of one core, mind. If you want to use more voices, just adjust the instrument properties tab, but I find four is a nice balance since sampled material tends to be timbrally rich to begin with and you probably don’t want too many voices playing at once.
Loupe 2 improvements
Autoslicing function – set base note, number of slices, and hit the slice button to automatically map sample segments across the keyboard. Works great on beatloops as well as melodic material!
New GUI with color coded per-slice parameters and polyphonic slice markers mapped across the waveform display
Visual feedback showing the effect of position LFO
Improved slice reverse function
Delay mode: slice parameters, repitching, slice areas, filter, reverse and envelope can be mapped to live audio, with buffer freeze features
A one-knob “clarify” control rolls off the bass and boosts treble so your samples sit better in the mix
MIDI mappable per-slice fine start and length controls allow you to fine tune slice position from a MIDI controller without reaching for the mouse
A new Hold control sustains struck notes, freeing your hands to perform with the global controls
TouchOSC iPad template is included in the archive
Improved slice position LFO and other small tweaks and bugfixes
First of all, it looks nicer! I don’t know about you but to me looks matter and I find I use a tool more if it’s visually appealing. The controls have been rearranged into more logical groupings.
There is a new autoslice feature. Select a first note and a number of slices and Loupe will slice the sample into that number of slices and assign the slices to that note and the subsequent notes going upward on the keyboard. Let’s say you create twelve slices from middle C upwards. If you then slice from the C above middle C upwards in 16 slices, the previously sliced middle C range will be undisturbed. The “set all” controls below the per-slice parameters have also been modified to only affect the currently selected range. Note: in the presets in Loupe 2, I’ve used the the 16 notes from middle C upwards.
Naturally, you can still assign freeform loop segments by dragging on the waveform with the mouse. There are also fine start and fine length controls that are easily MIDI-assignable – after slicing a wave into even chunks, you can use a MIDI (or OSC) controller to play one note after another and fine tune the per-loop position and size from your control surface.
The reverse control now reverses the exact current area of a slice, instead of flipping over to the area prior to the current slice area. I find this is more intuitive and is what users expect from a reverse control. It also works a lot better with drum loops. Why didn’t it work this way in the first place? Mea culpa, gentlemen, mea culpa.
There is now a “clarify” control that drops the bass and boosts the treble, a one gesture EQ effect that I often use to help a sampled musical phrase fit into a new track and stand out without muddying the mix.
Another HUGE change is the new delay mode:
There’s also a number of small bugfixes and enhancements – little persnickety things I discovered as I overhauled the instrument – as well as new samples and presets, though if Loupe is the kind of instrument that appeals to you, you will certainly want to import your own samples and create your own sounds. Loupe is a creative tool, not a rompler. If you have a few gigabytes of field recordings and choice vinyl and tape samples, have I got the tool for you…!
Loupe 2 can be yours for $20 USD. Buy Loupe 2 now by clicking here:
The encrypted archive for Loupe 2 can be downloaded here. When you buy, you will be emailed a code to unlock the archive. Please provide a valid email address!!
Loupe 2 is a Reaktor instrument and requires a full installation of Reaktor 5.8.0 or newer. It will not work with Reaktor Player.
–
Loupe 2 with its major new features is a separate instrument from Loupe 1 and it won’t be a free upgrade to Loupe 1 users. I am however introducing an amnesty period – if you bought Loupe anytime from September 2012 until now, you get Loupe 2 for free. Please be patient as I send out updates.
Now, what about my other sampling instruments – Mirage and Paramdrum? Am I going to upgrade them to “version 2” with major new features and charge again? No, but I will be reskinning them with the new look, plus a few minor tweaks, as point releases in the near term.
–
Special thanks to Felix Petrescu of Makunouchi Bento for his invaluable assistance beta testing as well as acting as a software muse, pushing for features that have made Loupe a better instrument.
Mac users: I’ve been getting complaints from people using Stuffit Expander to decrypt the Loupe 2 archive. In my humble opinion, Stuffit Expander is five pounds of shit in a two pound bag. To open a password protected RAR file use one of these:
Forgot to add: Loupe 2 comes with TouchOSC support – a template is included in the package. Set up bi-directional OSC, and selecting a slice in Loupe updates the controls on the iPad which is… pretty cool.
–
Loupe 2.0.2 bugfix now available – corrected a problem with auto-slicing where moving the slice # control after slicing would change the sample position.
In this video I walk you through creating a simple multipurpose sampler in Reaktor. I introduce you to basic Reaktor concepts like control and audio signal flow, polyphony, sample import and mapping, signal modulation with an envelope and adding factory effects. This is an introductory level video but it covers a lot of important territory you need to know to build more advanced structures.
Look forward to more videos from me – the next one will be on creating a sequenced beat production center from scratch.
Here is version 1.03 of the Chroma and Gris Gris sequencer and synth, which adds a few features and fixes a couple of minor bugs. The Gris-Gris synth now has two additional filter types, bandpass and high pass, and a ring mod control for metallic and bell tones. It comes with a much expanded and refined Lemur template that allows full editing of sequences.
To celebrate the release of this new version, the Chroma and Gris-Gris sequenced synth ensemble is temporarily reduced in price from $24.99 to $19.99
Chroma can be purchased and downloaded right now. Remember, Chroma is a Reaktor ensemble and requires a full installation of Reaktor 5.8.0, not just Reaktor player.
A link will be emailed to you immediately upon completion of payment.
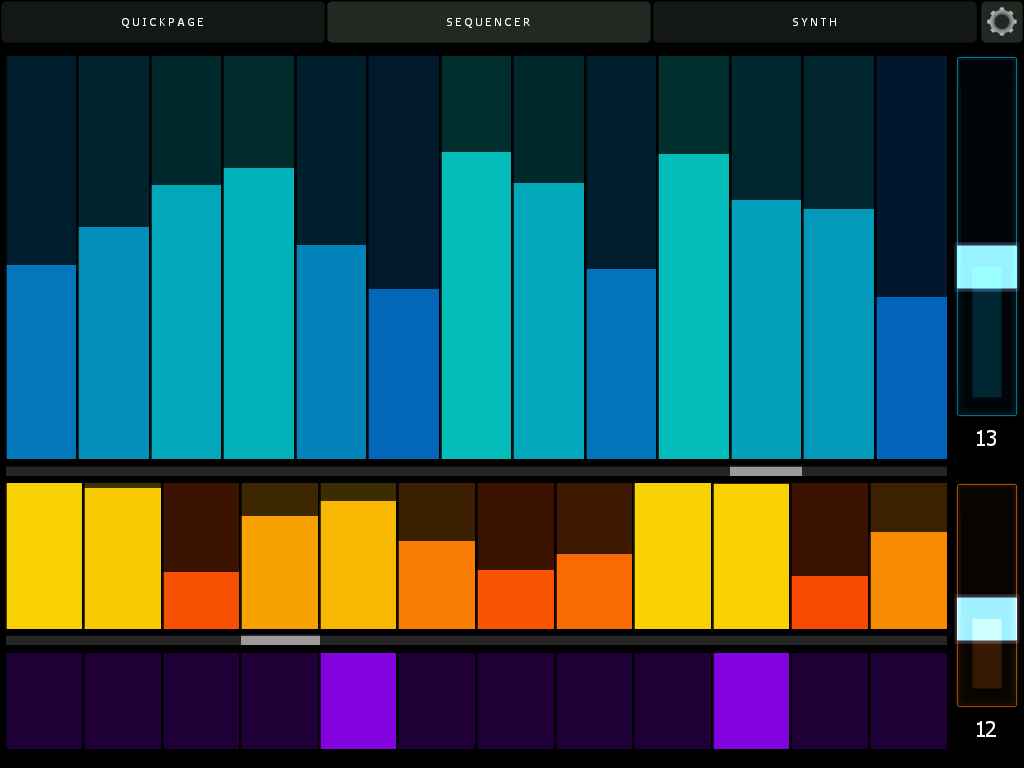
I’ve also added further support for Lemur. The new template has three pages – the original quickpage, plus a sequence edit page and a full synth edit page that offers control of every parameter in the Gris-Gris synth. The quickpage now has controls for sequence speed, key and scale type.
Here’s the sequencer page. Swipe a finger across to set pitch and velocity, or use multiple fingers to adjust many values at once. If you enable bidirectional control, all parameters in Lemur will update on snap change, including sequence lengths and values. Note the cursors – their position will move as Chroma plays, letting you know where you are in the sequence without having to keep your eyes on the computer screen.
Here’s the synth page. All Cgris-Gris parameters are editable and also update when you change snaps in Reaktor. The filter section features a drop down menu to select scale types.
Here’s the updated cheat sheet – new features on the GUI are highlighted in blue.
Now, about that bidirectional control – in order to have your Lemur controls update when you change Reaktor snapshots, simply create an OSC target called Lemur, and direct it to port 8000 and whatever the IP address of your iPad is on your local or ad hoc network. Here’s what my config looks like:
Pretty easy, actually. Make sure you use port 8000 for Lemur though – that is its standard port and cannot be changed. (I use port 10001 for Konkreet Performer and TouchOSC)
More info on Chroma and Gris Gris, including video, is here.
Ladies, Gentlemen, Exalted Bipeds, may I introduce to you my latest creation, the Chroma and Gris-Gris ensemble:
Chroma is a performance oriented monosequencer and VA carefully tuned for ergonomic ease of use and glitch free operation in standalone and plugin mode. Slur features in Chroma match up with legato and glide features in the Gris-Gris synth to create a slinky sinuous note articulation.
Sequences can be created and controlled via mouse, MIDI, Konkreet Performer, TouchOSC and Lemur. Since there is now full OSC support in the Reaktor plugin version, you can do everything with Chroma in your preferred DAW that you can do stand-alone. A dream come true!
Now, about those Konkreet Performer mappings:
TouchOSC and Lemur templates are included in the package but there’s something special about Konkreet Performer that sets things on fire when it’s paired with Chroma and Gris Gris, a certain magic in the way it morphs and distorts sound. It is my firmly held opinion that not nearly enough people use KP and if you want something really special and unusual on your iPad you should rush right over to Konkreet Labs or head straight for the App Store and buy a license.
The Gris-Gris synth is easy to program, surprisingly versatile, screams like a bastard and can be played on its own with MIDI input. Check out the effects bank for some wild quasi-modular sounds. A dedicated filter LFO with a morphing shape control and chaos flux knob provide mutating automation. Flux controls are also provided for the mix and filter feedback sections. Want more sounds? Here ya go:
Chroma’s MIDI output can be used to trigger external synths as well, depending on the completeness of the synth’s MIDI implementation. Tested and fully working synths include NI Massive, NI Absynth, U-he Tyrell and Tal Noisemaker. Some synths may work perfectly for note sequences but not for slur and glide.
Here’s the full cheat sheet:
Chroma is 24.99 USD temporarily reduced in price to $19.99 and can be purchased and downloaded immediately. Remember, Chroma is a Reaktor ensemble and requires a full installation of Reaktor 5.8.0, not just Reaktor player.