Category Archives: Instruments

Vectorspace: Gestural Sequenced Sampler for Reaktor

square

Vectorspace is a CPU friendly sample based ensemble for Reaktor whose sound at any given time is a superposition of gestural sequencers and effects. It also includes a sequeggiator – a probabilistic sequenced arpeggiator – that plays staggered chords as polyphonic sequences, creating a constantly evolving blend of rhythm and harmony.

vector-sampler

Vectorspace is ideal for transforming an acoustic instrument or synth sample plus a simple chord progression into the rhythmic and harmonic scaffolding of a track – just add some drums and bass.

vector-arp

It can also be played as a more traditional sampler, a soundscape creator or as a physically modelled synth using the sampled material as an exciter and the resonator effect as a body. The resonator is polyphonic and responsive to note and chord changes. Its partials can be tuned, damped and skewed to create bell, percussion and drum sounds, or abstract reverberations.

vector-res

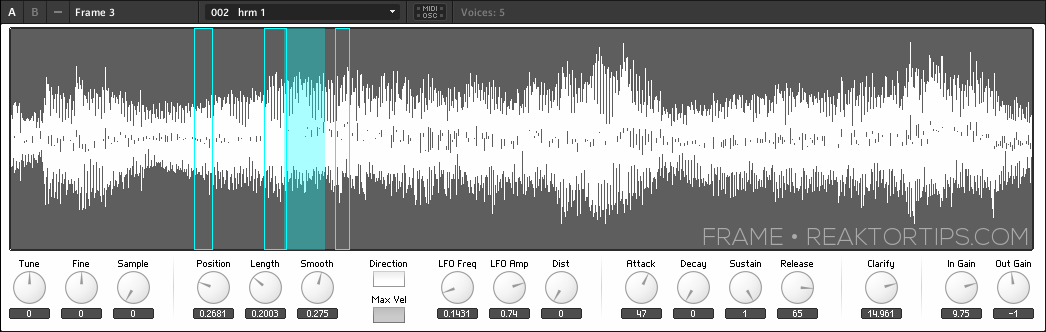
The sample position, sample length, grain spacing and envelope parameters can all be automated, as can the resonator, growl, filter and delay effects. Each XY fader can run in smooth or quantized mode, and quantized mode allows you to set individual clock speeds and sequence lengths for the X and Y axes of each automated fader. Quantized mode also gives you the opportunity to edit and fine tune the level of each step in a fader’s X and Y sequences. This makes it easy to create gated rhythmic filter effects or gradual changes. Sample position and automated fader controls can be controlled by MIDI (see mappings on panel B) or OSC.

vector-growl

It is impossible to predict precisely what sounds will be produced when you have various effects activated with different sequence lengths on different parameters. But at the same time, the gestures and sequence settings are under your control, so the end result will be a blend of your intent and the superposition of the cycling sequences. Think of it as an “inspire-o-graph” for sound, a machine collaborator to bounce back your ideas transformed. What it’s not good for: wobble basses, control freaks, type “A” personalities. Loosen up!

vector-fullgui

Vectorspace also features a compressor to even out the sound, and a microtuning macro that allows you to define any equal tempered tuning in either cents or Hz. Set a 5 or 7 tone scale for an easy exotic sound with no wrong notes or choose a 17 note octave division as the basis for an Eastern tuning.

vector-comp

Update: Vectorspace 1.0.1 is now on the server – download notifications to existing users will follow shortly. New features include an intensity control for the Growl macro, allowing you to set a more moderate upper limit to the sound mangling while still using the pad’s full range of travel:

intensity

1.01 also includes mappings for Antonio Blanca‘s Lemur template The Ring, which you can download at Twisted Tools, and a few new snapshots created by warping parameters with The Ring. Here’s how I’ve mapped the parameters:

IMG_1561

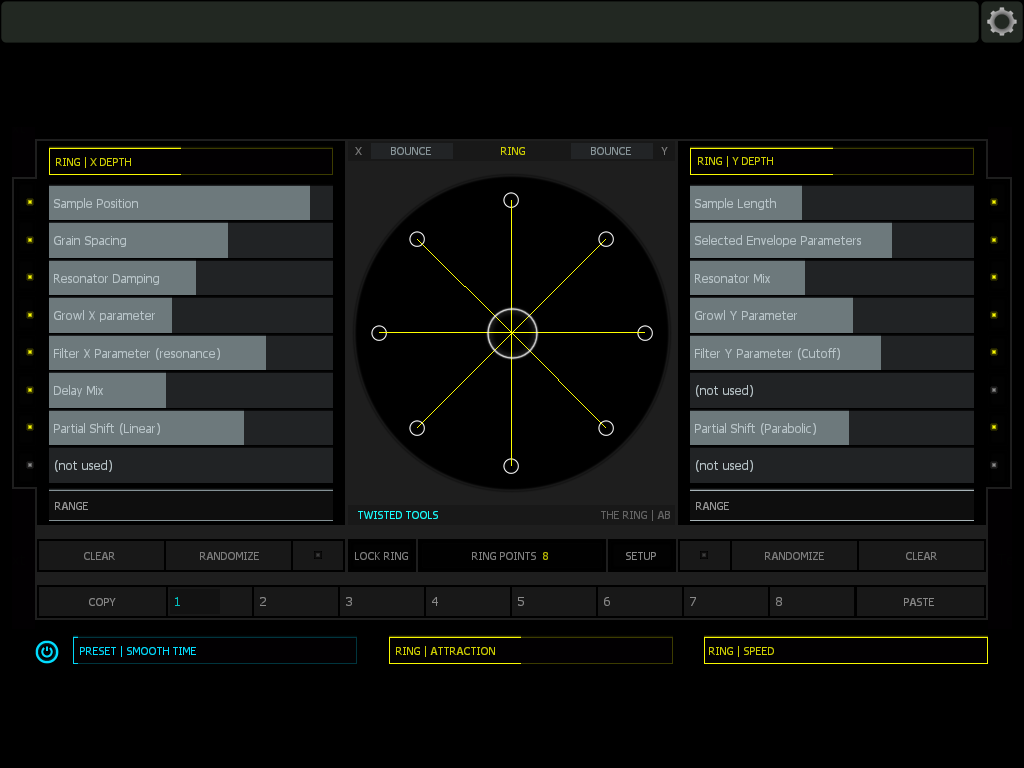
…and one of Antonio’s other great templates, SQU4R-3

Squar-e

The Lemur templates are meant to control Vectorspace strictly in OSC mode. You may want to turn off MIDI output from Lemur to Reaktor, especially with The Ring which sends a note on touch.

Speaking of control surfaces, here’s how the Vectorspace parameters are mapped in Konkreet Performer, and some updated Performer templates. (these ones are prettier, like in the picture below)

IMG_1562

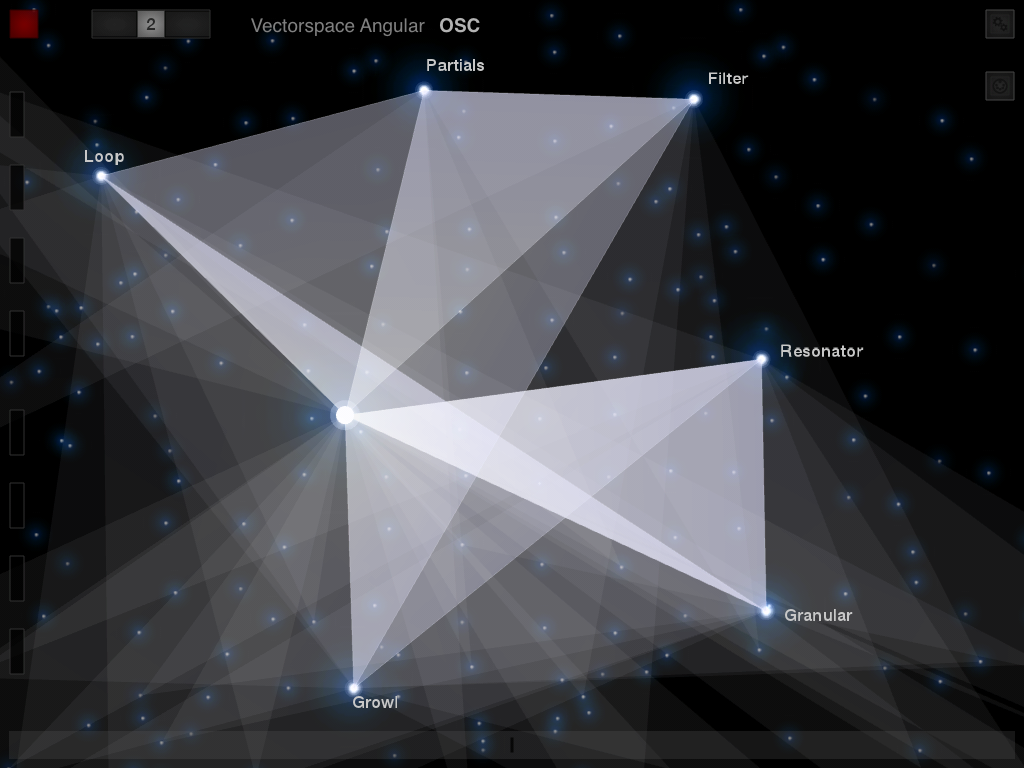
Konkreet Performer is almost always the first control surface I map my ensembles to – it’s simple, elegant, quick to configure and yields awesome leverage over sound.

Please note: Vectorspace requires the full version of Reaktor 5 version 5.9.2 or better, not just Reaktor player. Full versions of Reaktor 5.9.2+ acquired with Komplete will also work, of course.

Vectorspace comes with a detailed 11 page manual you can download here: Vectorspace Manual 1.0

Buy Vectorspace here for $39.75 $26.50 USD by using the discount code VECTORSPECIAL:

Add to Cart

Please use a valid email address to receive Vectorspace and updates! Immediately upon completion of payment, you will receive a link to an archive containing Vectorspace, the manual, and control templates for Lemur, Konkreet Performer and QuNeo.

[Press Kit]

Microtuning in Reaktor – with Instrument Download

microforum

About a year ago I fell under the spell of Aleksi Perälä’s album MU3. I listened to it whenever I could, and heard it in my head when I couldn’t play it. It was subtly, maddeningly different, and stood out from the other new electronic music I was hearing around that time. It sounded pleasantly detuned, but not randomly so. What was he doing?

Continue reading

Music Production Tutorials Explores Frame 3

Danny J. Lewis of Music Production Tutorials tried out my free Frame 3 ensemble and liked it so much he made a brief video demonstrating what happens when you explore parameter changes in one of the default snapshots.


What’s interesting here is how deep he goes into the sound… Frame was designed for just this sort of exploration, for deep dives into detailed samples to bring out hidden goodies and details.

More on Frame 3 including download link and tutorial series 

Frame’s big brother Loupe is here

Adding Samples to the Frame 3 Creative Sampler

This is a quick video tutorial on adding samples to Frame 3, my free creative sampler for Reaktor which you can download here, where you will also find Part 1 of the tutorial. Part 2 is here.
 

Update: just got a great idea from a KVR forum member: adding unison effects to Frame 3. It’s very easy – simply bump up the number of voices in the instrument’s function palette tab, and set the min / max to a factor of the voice count. Here for example, each note you play will have four voices. Play with the “spread” control too, which determines the amount of detune between unison voices.

Related posts:


Frame 3 – Free Creative Sampler for Reaktor + Tutorial Series

Frame is a simple Reaktor sampler I built to implement a type of freeform looping and creative sampling I felt was missing from most other software samplers on the market. Frame allows you to define a window of sound and sweep it across the sample as it plays without glitching or popping. Depending on the size of the sample, the smoothness, the spacing, and whether or not you’ve turned up the position / length LFO, you can get results that are reminiscent of some of the great creative sampling musicians – well alright, this also requires skill and taste; all I’m doing here is removing one of the technical hurdles. 😉


Today we begin a series of tutorials that are going to start with picking apart and explaining Frame’s structure then move on to sound design and even modifying the structure – adding more modulations and even sequencing, perhaps. I’m open to suggestions!


First off, let’s have a look at the heart of the instrument, a grain cloud sampler. This module sometimes get a bad rap for eating CPU but it’s one of the most versatile and useful sampler modules in Reaktor and the CPU use can be tamed. Here in the grain cloud sampler module’s properties, I’ve set “overlap” to 1 rather than the default 32. Right away that eliminates a ton of CPU usage.

The trick here is, each note will correspond to a single grain of sampled sound, which allows us to juggle individual grains using Reaktor’s voice logic. In fact, each grain can now be thought of as a slice or loop. We’ll look at how to leverage this in upcoming Frame tutorials.

I’ve clicked on the grain cloud sampler module below which shows all the incoming and outgoing connections highlighted in blue. Notice that I’m not using any of the built in jitter controls, which in my humble opinion can create a stereotypical Reaktor-ish sound which I’d like to avoid; there are other ways to modulate the same parameters that afford better control over the character of the sound.

Starting at the top, there are gate and pitch controls. The gate restarts playback of grains at the G input on the grain cloud sampler, and also triggers an envelope that is connected to multiplier modules to control the sound’s attack, decay, sustain and release.

A tuning macro provides coarse and fine tuning. Here’s what’s inside it:

You may well wonder, why is 60 being subtracted from the incoming MIDI signals? It’s to simplify the process of sample mapping. Frame doesn’t work like a Kontakt style sampler, where typically an instrument like a piano or bassoon is sampled in different key ranges which are mapped across the sample map. Instead, it’s designed to place one sample in each slot (or key) on the map, up to 127 samples, and a sample is selected and played back within a narrow range – you will probably want to stay within an octave of middle C upwards or downwards unless you’re going for particular special effects. And instead of playing one-shots like an emulated instrument, you will want to use samples of short musical phrases, beats, field recordings and such.

TL;DR version: think of pitch zero as neutral, and negative and positive pitch values as repitching the sample upwards and downwards.

An important feature here: the sample select knob, with values that run from 0 to 127, is added to the pitch – so when sample 7 is selected, 7 semitones are added to the playback pitch of the note. Why is this? It’s done in order to simplify the addition of notes to the Frame sample map, which looks like this:

Each note in the sample map has a root which starts at 0 for the first sample and counts up from there. So sample 7 has a root pitch with the MIDI value of 7. In order to play it back unpitched, it has to play back at a MIDI pitch of 7. When adding samples to Frame, it’s important to have “move root with low note” ticked in this menu:

Fortunately, unless you’re hacking Frame or designing your own sampler from scratch, you don’t have to think much about this – just add samples consecutively to the sample map and start playing.

And this is what I want you to do now – start playing Frame. All the controls are tool tipped so it should be self documenting. Try different sorts of sampled material – 5 to 10 seconds at a time works best – and especially try different smoothness, LFO and envelope settings. You will be surprised at how much sculpting you can do on a single sample with just those controls.

Frame is free and can be downloaded here. As with the other instruments I’ve created for Reaktor, it requires a full installation of Reaktor 5.8. Importing samples is easy and follows the same procedure as its big brother Loupe, a process documented here.