Tag Archives: tutorial

More on routing Reaktor in Live: multi out audio UPDATE: VST works too, not just AU

Reaktor has flexible audio out ports – you’re not limited to stereo, and you can take advantage of that in Live.

Fire up Live and load the Reaktor AU (UPDATE: VST version will work too). Load the Aerobic ensemble, and in the lower right corner, turn on the “out” switch. This will enable multi-out for Aerobic, so each drum unit can be routed to one of four stereo pairs.

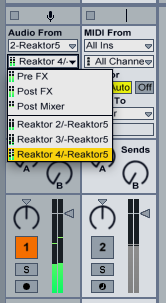
Then go to an audio track, select audio from your Reaktor track, and select either the pre or post FX for the first stereo pair, or one of the three others.

This means you can apply effects to each stereo pair by routing them to different tracks.

But what if you don’t want to use Reaktor’s outputs in pairs? Let’s say you’ve built a crazy custom ensemble with a mono sampler, a sine, a square and a saw wave, and you want to route them individually to the first four outputs. What you can do then, is use Live’s mono track insert effect to choose either the right or left channel exclusively.

So there ya go – easy flexible routing. I’m not sure why it won’t work with the VST version of the plugin, and I’m too bushed to fire up Windows and find out if it works properly there. Are there any Windows users who’ve tried this?

UPDATE: turns out routing with the VST plugin version does work properly after all. I think I had the monitor setting wrong in the receive track. Sorry for the disinformation! Remember to turn off the track activator for the track holding Reaktor, and if you want the first stereo pair, choose pre or post FX in your target track, not post mixer (that would be the muted signal).

Sending MIDI CC with the Channel Message module


I’ve been working with someone on creating custom MIDI controllers for use in Ableton and thought I’d share ideas. The most flexible way to send MIDI in Reaktor 5 is to use the Channel Message module.

The input ports, from bottom to top, work like so:

  • Val: self explanatory. This is where you send the value of the message you want to transmit. By default the range is zero to one, but you can change this in the module properties.
  • Nr: In this case, the number of the MIDI CC to transmit.
  • Ch: The MIDI channel to transmit on. This overrides the settings of the instrument containing the module, but you can go into the module properties and tell it “always use instrument’s send channel”.
  • St: Status – this determines what kind of message will be sent. We’re sending type 3 which is a MIDI controller message. You can also send note on/off information, pitch bend, and so forth.

The tricky bit: this module only sends data when it receives events at the St input. When it receives an event there, it transmits whatever values are at its other inputs. That’s why I’m using the order and value modules, to ensure that every control change is followed by an event with the value “3” at St. Hover over St and the other ports for hints on what values they accept and what the values mean.

I’ve deliberately kept the structure as simple as possible for clarity… some enhancements you might make are to add panel controls to set the MIDI channel and CC#, and to rig up a more interesting event source than a knob. How about the LFO module? Try it but keep in mind the default range of the LFO is -1 to +1, not 0 to 1. You can either compensate with a few math modules or (not recommended) change the default range in the Channel Message module’s properties.

Here’s the test ensemble – build something fun with it!

Modifying Spiral’s Scales

I was talking to someone on the NI Reaktor forums about this and decided to post it here for everyone’s benefit.

The Spiral instrument, which sends algorithmically generated MIDI to other instruments or synths, has a limited number of scales and you might want to customize it to add your own scales. Here’s how to do it.

You have to dig down through the macros into trig note -> pitch correction -> scales and make the “scales” table visible.

Then you can choose the notes you want to be included and excluded from a given scale.

Of course, then the scales won’t match the labels… I’d advise modifying the chromatic scale as your custom one because it’s the easiest to return to its default value (all notes included, none excluded).

It’s interesting programming in Spiral, the way they did this – looks like the instrument retains the previous pitch if the current pitch is not in the scale.

Granular Sampler Download – Very Simple Grainer 02

Didn’t I say I’d have the next installment in this series ready “next week” a year ago? Dang.

Very Simple Grainer 02 from Peter Dines on Vimeo.

Here’s a new and improved version of the Very Simple Grainer, with some new features, fixes and a couple of new samples. I’ve moved controls around, added the very nice sounding Core saturator that comes with Reaktor 5, added LFOs to the grain size and speed parameters, and fine tuned a couple of other things. If you’ve been following the material I’ve posted here and at Noisepages, you should be able to puzzle it out. If you have questions or feature requests, post a comment.

Download Here

The first iteration, with instructional PDF, is here.

Update: you’ll want to add your own samples as I’ve only included two. Use this technique and set them all to a root key of zero.

Vintage Graphical Skinning Tutorial

The aptly named Jonathan Style creates some of the finest styles in Reaktor skins and GUI elements. In this post at his blog you’ll find a tutorial on creating your own graphics. He has a lot more material at his site so check it out – simply gorgeous graphics.

My own approach to Reaktor GUI design is minimal at best – I like to use the built in tools and maybe work with colors a bit, because my stuff is always in a state of rebuilding and flux. But if you have a finished work, laying a nice skin across it can really change the way you view it and work with it.