
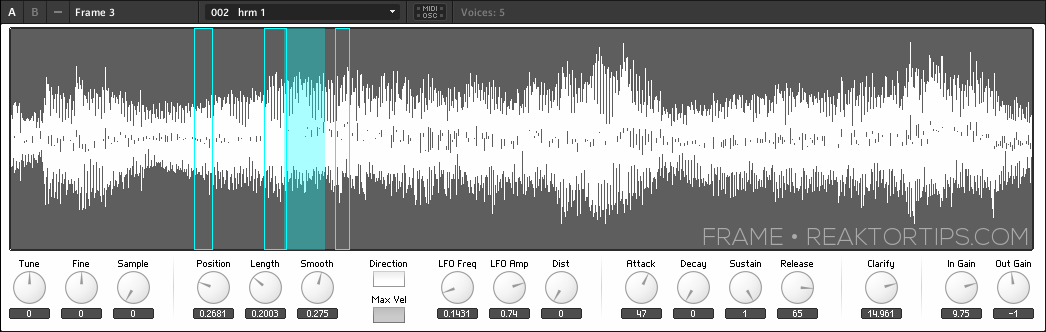
Frame is a simple Reaktor sampler I built to implement a type of freeform looping and creative sampling I felt was missing from most other software samplers on the market. Frame allows you to define a window of sound and sweep it across the sample as it plays without glitching or popping. Depending on the size of the sample, the smoothness, the spacing, and whether or not you’ve turned up the position / length LFO, you can get results that are reminiscent of some of the great creative sampling musicians – well alright, this also requires skill and taste; all I’m doing here is removing one of the technical hurdles. 😉
Today we begin a series of tutorials that are going to start with picking apart and explaining Frame’s structure then move on to sound design and even modifying the structure – adding more modulations and even sequencing, perhaps. I’m open to suggestions!
First off, let’s have a look at the heart of the instrument, a grain cloud sampler. This module sometimes get a bad rap for eating CPU but it’s one of the most versatile and useful sampler modules in Reaktor and the CPU use can be tamed. Here in the grain cloud sampler module’s properties, I’ve set “overlap” to 1 rather than the default 32. Right away that eliminates a ton of CPU usage.

The trick here is, each note will correspond to a single grain of sampled sound, which allows us to juggle individual grains using Reaktor’s voice logic. In fact, each grain can now be thought of as a slice or loop. We’ll look at how to leverage this in upcoming Frame tutorials.
I’ve clicked on the grain cloud sampler module below which shows all the incoming and outgoing connections highlighted in blue. Notice that I’m not using any of the built in jitter controls, which in my humble opinion can create a stereotypical Reaktor-ish sound which I’d like to avoid; there are other ways to modulate the same parameters that afford better control over the character of the sound.

Starting at the top, there are gate and pitch controls. The gate restarts playback of grains at the G input on the grain cloud sampler, and also triggers an envelope that is connected to multiplier modules to control the sound’s attack, decay, sustain and release.
A tuning macro provides coarse and fine tuning. Here’s what’s inside it:

You may well wonder, why is 60 being subtracted from the incoming MIDI signals? It’s to simplify the process of sample mapping. Frame doesn’t work like a Kontakt style sampler, where typically an instrument like a piano or bassoon is sampled in different key ranges which are mapped across the sample map. Instead, it’s designed to place one sample in each slot (or key) on the map, up to 127 samples, and a sample is selected and played back within a narrow range – you will probably want to stay within an octave of middle C upwards or downwards unless you’re going for particular special effects. And instead of playing one-shots like an emulated instrument, you will want to use samples of short musical phrases, beats, field recordings and such.
TL;DR version: think of pitch zero as neutral, and negative and positive pitch values as repitching the sample upwards and downwards.

An important feature here: the sample select knob, with values that run from 0 to 127, is added to the pitch – so when sample 7 is selected, 7 semitones are added to the playback pitch of the note. Why is this? It’s done in order to simplify the addition of notes to the Frame sample map, which looks like this:

Each note in the sample map has a root which starts at 0 for the first sample and counts up from there. So sample 7 has a root pitch with the MIDI value of 7. In order to play it back unpitched, it has to play back at a MIDI pitch of 7. When adding samples to Frame, it’s important to have “move root with low note” ticked in this menu:

Fortunately, unless you’re hacking Frame or designing your own sampler from scratch, you don’t have to think much about this – just add samples consecutively to the sample map and start playing.
And this is what I want you to do now – start playing Frame. All the controls are tool tipped so it should be self documenting. Try different sorts of sampled material – 5 to 10 seconds at a time works best – and especially try different smoothness, LFO and envelope settings. You will be surprised at how much sculpting you can do on a single sample with just those controls.
Frame is free and can be downloaded here. As with the other instruments I’ve created for Reaktor, it requires a full installation of Reaktor 5.8. Importing samples is easy and follows the same procedure as its big brother Loupe, a process documented here.

